Looking For Volkswagen Headlight Installation Help?
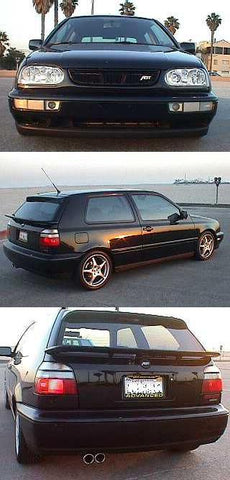
As the Golf and Jetta III’s were becoming aged in style, Volkswagen finally took that step and began to produce the new-bodied Golf and Jetta IV’s. As you can expect from any growing auto manufacturer, Volkswagen updated the lines and looks, bringing a style that was fit for the 21st century. With the introduction of the new Golf and Jetta IV’s, there seemed to be quite a lot of hoopla about the new styling, which left some of the MK III owners feeling down and out. While the shape of the newer Golf & Jetta’s remained similar, it was really the new style headlamps that A3 owners were envious of.
Much to our surprise, Hella, our father of lighting in Germany blessed us with the latest generation of FF (Free Form) technology lighting found on the late model Golf & Jetta IV’s. This type of technology not only increased visual lighting, but it also improved and up-dated the look for either the Golf or Jetta III ( Jetta’s require a hood change). Unfortunately, while much praise goes to Hella for making them, they seem to have forgotten that * we * in the United States were going to want them just as much as our European Brothers across the pond. With that being said, the Hella’s were only designed to fit the European Radiator supported vehicles.
With the release of these new headlamps, there seem to be some concern of whether or not they would fit the U.S. Spec’d vehicles. Luckily we didn’t have to wait long as the Hella Fitment God ( Mike Potter ) quickly revealed the answer.
For those of you that have been hiding in secret caves and lost islands, Mike Potter, who is often referred to as "the Potterman" and owner of, has been custom modifying and fitting European light kits for the past 5 years. Through out a number of installs, he has streamlined the process of fitting these euro-light kits (mainly Hella Dual rounds) so that they fit as though they were made for the U.S. version models. As a matter of fact the Potter Dual Round Kit has an estimated installation time of 30 minutes to 1- hour!
Since Mike was already very familiar with fitting European headlamps in U.S. cars, he quickly figured out the best way to mount and wire these FF style headlamps. He is to date the only reseller that custom modifies the headlamps providing brackets and wiring that makes this not so easy job into a 95% "plug and play" situation. Not only is the installation easy, but the fit is perfect.
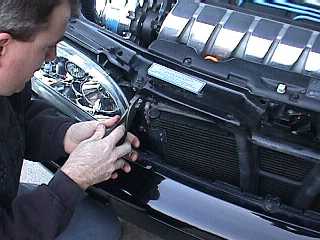
Here Mike walks us through what we need to know when installing the Potter modded MKIV lights.
- Remove the factory headlamps and grill ( do not cut any of the factory wiring and do not loose the factory headlamp screws).
- Cut the core support along the line shown here with a high-speed Dremel. This usually takes about 2 cutting discs. Before cutting, be sure to wear the appropriate eye protection and use a thick piece of cardboard as a buffer between the core support and radiator.
- Now use some "Stop Rust" and spray down the newly cut area.
- Bend the upper tabs to a 45 degree angle.
- Now use the Potter brackets and factory bolts (3 on each side) and begin to bolt in headlamps. This kit also comes with a 4th heavy duty screw that will secure the 4th open mount.
- With the headlamps in place, it is plug in play with the wire looms- note: they will only plug in the right way.
- If you want the city lights to work you will have to tap into the parking light loom. In order to use the city lights with the parking lights a Euro Switch is necessary.


Installing the Kamei Grill
- Remove the lower bolts & toss these away. The two tabs and two bolts will hold this grill firmly in place. If the tabs ever break Potter carries replacement tabs for the Kamei Grill.
- Do a pre-fit and mark the appropriate drilling locations. There is a total of 2 hole that must be drilled. Also take note of the light assembly and grill. These two items should be flush. If they are not, the first place to start would be to bend the upper core support – as pictured here. According to Mike all cars seem to be a little different here and some bending is very common.
- Once the holes are drilled, pop the grill in to place starting with the lower tabs first, then screw the top two bolts in.


For More Information Contact us at 951-694-6393 or Visit Us At Parts4vws.com!